Linux Network Namespace
Linux namespace 的概念
Linux 内核从版本 2.4.19 开始陆续引入了 namespace 的概念。其目的是将某个特定的全局系统资源(global system resource)通过抽象方法使得namespace 中的进程看起来拥有它们自己的隔离的全局系统资源实例(The purpose of each namespace is to wrap a particular global system resource in an abstraction that makes it appear to the processes within the namespace that they have their own isolated instance of the global resource. )。Linux 内核中实现了六种 namespace,按照引入的先后顺序,列表如下:
| namespace | 引入的相关内核版本 | 被隔离的全局系统资源 | 在容器语境下的隔离效果 |
|---|---|---|---|
| Mount namespaces | Linux 2.4.19 | 文件系统挂接点 | 每个容器能看到不同的文件系统层次结构 |
| UTS namespaces | Linux 2.6.19 | nodename 和 domainname | 每个容器可以有自己的 hostname 和 domainame |
| IPC namespaces | Linux 2.6.19 | 特定的进程间通信资源,包括System V IPC 和 POSIX message queues | 每个容器有其自己的 System V IPC 和 POSIX 消息队列文件系统,因此,只有在同一个 IPC namespace 的进程之间才能互相通信 |
| PID namespaces | Linux 2.6.24 | 进程 ID 数字空间 (process ID number space) | 每个 PID namespace 中的进程可以有其独立的 PID; 每个容器可以有其 PID 为 1 的root 进程;也使得容器可以在不同的 host 之间迁移,因为 namespace 中的进程 ID 和 host 无关了。这也使得容器中的每个进程有两个PID:容器中的 PID 和 host 上的 PID。 |
| Network namespaces | 始于Linux 2.6.24 完成于 Linux 2.6.29 | 网络相关的系统资源 | 每个容器用有其独立的网络设备,IP 地址,IP 路由表,/proc/net 目录,端口号等等。这也使得一个 host 上多个容器内的同一个应用都绑定到各自容器的 80 端口上。 |
| User namespaces | 始于 Linux 2.6.23 完成于 Linux 3.8) | 用户和组 ID 空间 | 在 user namespace 中的进程的用户和组 ID 可以和在 host 上不同; 每个 container 可以有不同的 user 和 group id;一个 host 上的非特权用户可以成为 user namespace 中的特权用户; |
Linux Network Namespace
network namespace 是实现网络虚拟化的重要功能,它能创建多个隔离的网络空间,它们有独自的网络栈信息。不管是虚拟机还是容器,运行的时候仿佛自己就在独立的网络中。
# 基于busybox镜像构建容器test1
[root@localhost ~]# docker run -d --name test1 busybox /bin/sh -c "while true; do sleep 3600; done"
# 查看test1容器的 Network Namespace
[root@localhost ~]# docker exec -it test1 /bin/sh
/ # ip a
1: lo: <LOOPBACK,UP,LOWER_UP> mtu 65536 qdisc noqueue qlen 1000
    link/loopback 00:00:00:00:00:00 brd 00:00:00:00:00:00
    inet 127.0.0.1/8 scope host lo
       valid_lft forever preferred_lft forever
2: ip_vti0@NONE: <NOARP> mtu 1480 qdisc noop qlen 1000
    link/ipip 0.0.0.0 brd 0.0.0.0
149: eth0@if150: <BROADCAST,MULTICAST,UP,LOWER_UP,M-DOWN> mtu 1500 qdisc noqueue
    link/ether 02:42:ac:11:00:03 brd ff:ff:ff:ff:ff:ff
    inet 172.17.0.3/16 brd 172.17.255.255 scope global eth0
       valid_lft forever preferred_lft forever

# 创建容器test2 并查看test2容器的 Network Namespace
[root@localhost ~]# docker run -d --name test2 busybox /bin/sh -c "while true; do sleep 3600; done"
0e3046ec1d7ea5845db3cd03cdc683bb03ebf897e4d55d30599f06d26f89a365
[root@localhost ~]# docker exec test2 ip a
1: lo: <LOOPBACK,UP,LOWER_UP> mtu 65536 qdisc noqueue qlen 1000
    link/loopback 00:00:00:00:00:00 brd 00:00:00:00:00:00
    inet 127.0.0.1/8 scope host lo
       valid_lft forever preferred_lft forever
2: ip_vti0@NONE: <NOARP> mtu 1480 qdisc noop qlen 1000
    link/ipip 0.0.0.0 brd 0.0.0.0
151: eth0@if152: <BROADCAST,MULTICAST,UP,LOWER_UP,M-DOWN> mtu 1500 qdisc noqueue
    link/ether 02:42:ac:11:00:04 brd ff:ff:ff:ff:ff:ff
    inet 172.17.0.4/16 brd 172.17.255.255 scope global eth0
       valid_lft forever preferred_lft forever

# 查看宿主机的 Network Namespace
[root@localhost ~]# ip a
1: lo: <LOOPBACK,UP,LOWER_UP> mtu 65536 qdisc noqueue state UNKNOWN group default qlen 1000
    link/loopback 00:00:00:00:00:00 brd 00:00:00:00:00:00
    inet 127.0.0.1/8 scope host lo
       valid_lft forever preferred_lft forever
    inet6 ::1/128 scope host
       valid_lft forever preferred_lft forever
2: eno16777736: <BROADCAST,MULTICAST,UP,LOWER_UP> mtu 1500 qdisc pfifo_fast state UP group default qlen 1000
    link/ether 00:0c:29:3d:e4:f6 brd ff:ff:ff:ff:ff:ff
    inet 192.168.31.210/24 brd 192.168.31.255 scope global noprefixroute eno16777736
       valid_lft forever preferred_lft forever
    inet6 fe80::20c:29ff:fe3d:e4f6/64 scope link noprefixroute
       valid_lft forever preferred_lft forever
3: docker0: <BROADCAST,MULTICAST,UP,LOWER_UP> mtu 1500 qdisc noqueue state UP group default
    link/ether 02:42:26:09:df:f1 brd ff:ff:ff:ff:ff:ff
    inet 172.17.0.1/16 brd 172.17.255.255 scope global docker0
       valid_lft forever preferred_lft forever
    inet6 fe80::42:26ff:fe09:dff1/64 scope link
       valid_lft forever preferred_lft forever
4: ip_vti0@NONE: <NOARP> mtu 1480 qdisc noop state DOWN group default qlen 1000
    link/ipip 0.0.0.0 brd 0.0.0.0
146: veth7e65841@if145: <BROADCAST,MULTICAST,UP,LOWER_UP> mtu 1500 qdisc noqueue master docker0 state UP group default
    link/ether 8a:bd:28:39:22:b8 brd ff:ff:ff:ff:ff:ff link-netnsid 0
    inet6 fe80::88bd:28ff:fe39:22b8/64 scope link
       valid_lft forever preferred_lft forever
150: veth8840821@if149: <BROADCAST,MULTICAST,UP,LOWER_UP> mtu 1500 qdisc noqueue master docker0 state UP group default
    link/ether 36:f2:e2:24:7b:29 brd ff:ff:ff:ff:ff:ff link-netnsid 1
    inet6 fe80::34f2:e2ff:fe24:7b29/64 scope link
       valid_lft forever preferred_lft forever

# 进入test1容器 发现可以ping同test2容器的eth0接口上的地址。
[root@localhost ~]# docker exec -it test1 /bin/sh
/ # ping 172.17.0.4
PING 172.17.0.4 (172.17.0.4): 56 data bytes
64 bytes from 172.17.0.4: seq=0 ttl=64 time=0.151 ms
64 bytes from 172.17.0.4: seq=1 ttl=64 time=0.109 ms
Linux Network Namespace
# 查看network namespace
[root@localhost ~]# ip netns list

# 删除network namespace
[root@localhost ~]# ip netns delete test1

# 创建network namespace
[root@localhost ~]# ip netns add test1
[root@localhost ~]# ip netns add test2

# 查看指定network namespace的详细信息
[root@localhost ~]# ip netns exec test1 ip a
1: lo: <LOOPBACK> mtu 65536 qdisc noop state DOWN group default qlen 1000
    link/loopback 00:00:00:00:00:00 brd 00:00:00:00:00:00
2: ip_vti0@NONE: <NOARP> mtu 1480 qdisc noop state DOWN group default qlen 1000
    link/ipip 0.0.0.0 brd 0.0.0.0

# 查看指定name space的接口信息
[root@localhost ~]# ip netns exec test1 ip link
1: lo: <LOOPBACK> mtu 65536 qdisc noop state DOWN mode DEFAULT group default qlen 1000
    link/loopback 00:00:00:00:00:00 brd 00:00:00:00:00:00
2: ip_vti0@NONE: <NOARP> mtu 1480 qdisc noop state DOWN mode DEFAULT group default qlen 1000
    link/ipip 0.0.0.0 brd 0.0.0.0
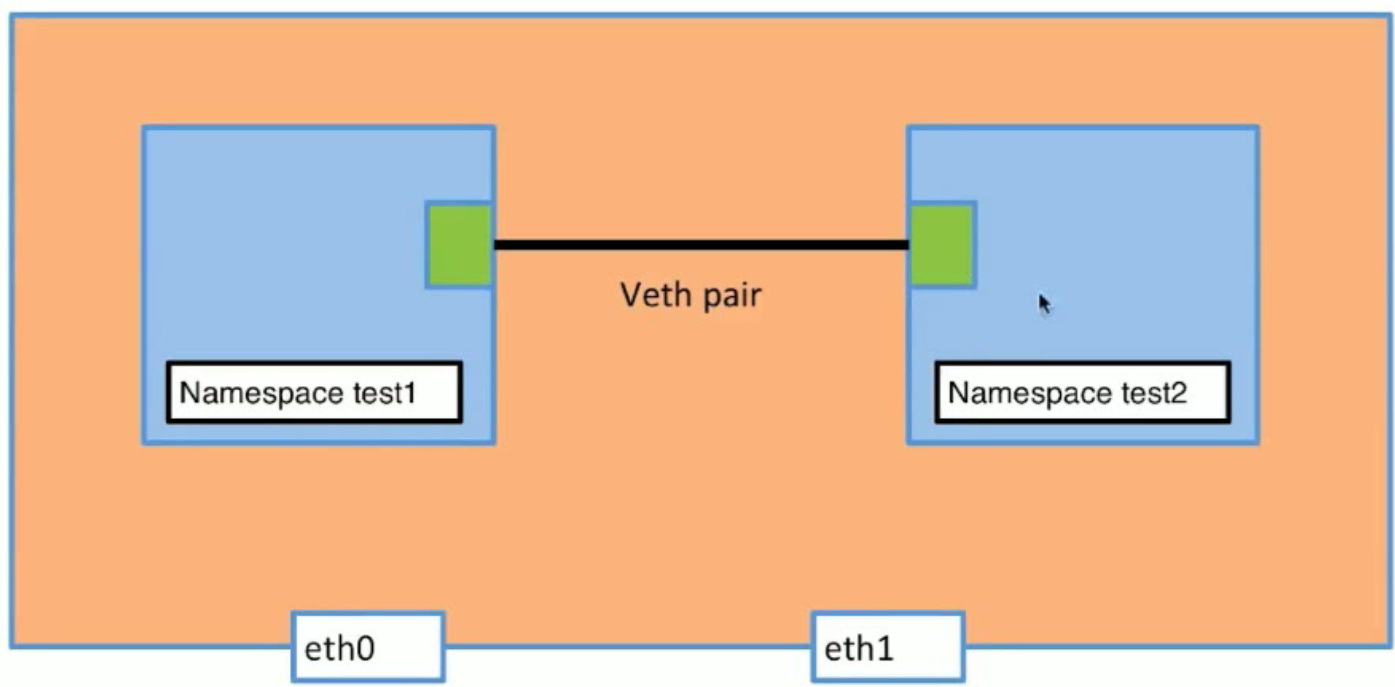
Network Namespace互联之 veth-pair
顾名思义,veth-pair 就是一对的虚拟设备接口,和 tap/tun 设备不同的是,它都是成对出现的。一端连着协议栈,一端彼此相连着。
正因为有这个特性,它常常充当着一个桥梁,连接着各种虚拟网络设备,典型的例子像“两个 namespace 之间的连接”,“Bridge、OVS 之间的连接”,“Docker 容器之间的连接” 等等,以此构建出非常复杂的虚拟网络结构,比如 OpenStack Neutron。
# 创建一对veth接口分别是veth-test1、veth-test2
[root@localhost ~]# ip link add veth-test1 type veth peer name veth-test2

# 创建一对veth接口:有mac,没有ip,状态都是down
[root@localhost ~]# ip link | grep veth-
153: veth-test2@veth-test1: <BROADCAST,MULTICAST,M-DOWN> mtu 1500 qdisc noop state DOWN mode DEFAULT group default qlen 1000
154: veth-test1@veth-test2: <BROADCAST,MULTICAST,M-DOWN> mtu 1500 qdisc noop state DOWN mode DEFAULT group default qlen 1000

# 将veth-test1接口添加到  Network Namespace  test1中
[root@localhost ~]# ip link set veth-test1 netns test1
# 发现veth-test1已经添加到 Network Namespace  test1中
[root@localhost ~]# ip nets exec test1 ip link
Object "nets" is unknown, try "ip help".
[root@localhost ~]# ip netns exec test1 ip link
1: lo: <LOOPBACK> mtu 65536 qdisc noop state DOWN mode DEFAULT group default qlen 1000
    link/loopback 00:00:00:00:00:00 brd 00:00:00:00:00:00
2: ip_vti0@NONE: <NOARP> mtu 1480 qdisc noop state DOWN mode DEFAULT group default qlen 1000
    link/ipip 0.0.0.0 brd 0.0.0.0
154: veth-test1@if153: <BROADCAST,MULTICAST> mtu 1500 qdisc noop state DOWN mode DEFAULT group default qlen 1000
    link/ether a2:09:2b:e9:d0:75 brd ff:ff:ff:ff:ff:ff link-netnsid 0
# 查看本机接口,发现veth-test1消失了。
[root@localhost ~]# ip link | grep veth-
153: veth-test2@if154: <BROADCAST,MULTICAST> mtu 1500 qdisc noop state DOWN mode DEFAULT group default qlen 1000

# 同理添加veth-test2 到 Network NameSpace test2中
[root@localhost ~]# ip link set veth-test2 netns test2
# 发现veth-test2也消失了。
[root@localhost ~]# ip link | grep veth-

# 分别为Network NameSpace test1和test2 的veth接口添加地址
[root@localhost ~]# ip netns exec test1 ip addr add 192.168.1.11/24 dev veth-test1
[root@localhost ~]# ip netns exec test2 ip addr add 192.168.1.12/24 dev veth-test2

# 分别开启Network NameSpace veth接口
[root@localhost ~]# ip netns exec test1 ip link set dev veth-test1 up
[root@localhost ~]# ip netns exec test2 ip link set dev veth-test2 up

# 分别查看Network NameSpace veth接口的状态
[root@localhost ~]# ip netns exec test1  ip a | grep veth
154: veth-test1@if153: <BROADCAST,MULTICAST,UP,LOWER_UP> mtu 1500 qdisc noqueue state UP group default qlen 1000
    inet 192.168.1.11/24 scope global veth-test1
[root@localhost ~]# ip netns exec test2  ip a | grep veth
153: veth-test2@if154: <BROADCAST,MULTICAST,UP,LOWER_UP> mtu 1500 qdisc noqueue state UP group default qlen 1000
    inet 192.168.1.12/24 scope global veth-test2

# 通过Network NameSpace test1 的veth接口 ping  test2 的veth接口。
[root@localhost ~]# ip netns exec test1 ping 192.168.1.12
PING 192.168.1.12 (192.168.1.12) 56(84) bytes of data.
64 bytes from 192.168.1.12: icmp_seq=1 ttl=64 time=0.133 ms
64 bytes from 192.168.1.12: icmp_seq=2 ttl=64 time=0.062 ms

# 通过Network NameSpace test2 的veth接口 ping test1 的veth接口。
[root@localhost ~]# ip netns exec test2 ping 192.168.1.11
PING 192.168.1.11 (192.168.1.11) 56(84) bytes of data.
64 bytes from 192.168.1.11: icmp_seq=1 ttl=64 time=0.096 ms
64 bytes from 192.168.1.11: icmp_seq=2 ttl=64 time=0.065 ms
Bridge

容器之间通信的原理
各个容器通过veth-pair与本地docker0互联,从而间接的实现了容器之间的通信。
容器连接Internet的原理
容器通过与宿主机的docker0,通过具体的物理网络接口并以NAT技术实现对Internet的访问。
# 查看docker网络
[root@localhost ~]# docker network ls
NETWORK ID          NAME                DRIVER              SCOPE
8322f6f7f661        bridge              bridge              local
15bcd4ce7873        host                host                local
14172bae898c        none                null                local

# 查看bridge网络信息  发现容器test1默认使用了 bridge网络
[root@localhost ~]# docker network inspect bridge
"Containers": {"0ee36a7343bee417894cc3b0dea527e28d6d66679736902c29c90a7aee7f6ddb": {
                "Name": "test1",
                "EndpointID": "4044e0d6f348b36bc1ad6428eeb7ea66b1c693530f9a22334572fa4f0d039c59",
                "MacAddress": "02:42:ac:11:00:03",
                "IPv4Address": "172.17.0.3/16",
                "IPv6Address": ""
            }
}

# 发现容器中的veth149与本机的veth150是一对veth,目的是为了让容器test1与宿主机docker0两个不同的Network Namespace之间可以通信。也就是说本地的veth150与本机的docker0是相连的。
[root@localhost ~]# ip a	#查看本机的网络信息
3: docker0: <BROADCAST,MULTICAST,UP,LOWER_UP> mtu 1500 qdisc noqueue state UP group default
    link/ether 02:42:26:09:df:f1 brd ff:ff:ff:ff:ff:ff
    inet 172.17.0.1/16 brd 172.17.255.255 scope global docker0
       valid_lft forever preferred_lft forever
    inet6 fe80::42:26ff:fe09:dff1/64 scope link
       valid_lft forever preferred_lft forever
150: veth8840821@if149: <BROADCAST,MULTICAST,UP,LOWER_UP> mtu 1500 qdisc noqueue master docker0 state UP group default
    link/ether 36:f2:e2:24:7b:29 brd ff:ff:ff:ff:ff:ff link-netnsid 1
    inet6 fe80::34f2:e2ff:fe24:7b29/64 scope link
       valid_lft forever preferred_lft forever
[root@localhost ~]# docker exec test1 ip a	#查看容器test1中的网络信息
1: lo: <LOOPBACK,UP,LOWER_UP> mtu 65536 qdisc noqueue qlen 1000
    link/loopback 00:00:00:00:00:00 brd 00:00:00:00:00:00
    inet 127.0.0.1/8 scope host lo
       valid_lft forever preferred_lft forever
2: ip_vti0@NONE: <NOARP> mtu 1480 qdisc noop qlen 1000
    link/ipip 0.0.0.0 brd 0.0.0.0
149: eth0@if150: <BROADCAST,MULTICAST,UP,LOWER_UP,M-DOWN> mtu 1500 qdisc noqueue
    link/ether 02:42:ac:11:00:03 brd ff:ff:ff:ff:ff:ff
    inet 172.17.0.3/16 brd 172.17.255.255 scope global eth0
       valid_lft forever preferred_lft forever

# 使用test1容器ping 宿主机的docker0
root@localhost ~]# docker exec test1 ping 172.17.0.1
PING 172.17.0.1 (172.17.0.1): 56 data bytes
64 bytes from 172.17.0.1: seq=0 ttl=64 time=0.127 ms
64 bytes from 172.17.0.1: seq=1 ttl=64 time=0.107 ms

# 如何查看证明:本地的veth150与本机的docker0是相连的
[root@localhost ~]# yum install bridge-utils
[root@localhost ~]# ip a | grep 150:
150: veth8840821@if149: <BROADCAST,MULTICAST,UP,LOWER_UP> mtu 1500 qdisc noqueue master docker0 state UP group default
[root@localhost ~]# brctl show
bridge name	bridge id		STP enabled	interfaces
docker0		8000.02422609dff1	no		veth7e65841
							veth8840821
							vetha7006c1
容器之间的link
- 创建容器时如果没有指定bridge,会使用默认的bridge。
- 创建容器时,link指定容器,这样新创新的容器就可以以容器名字的方式访问link指定的容器。
- 创建容器时可以指定自定义bridge,加入同一个自定义(非默认bridge)的容器之间可以通过使用容器名通信。
# 创建test2容器时指定link test1容器
[root@localhost ~]# docker run -d --name test2 --link test1 busybox /bin/sh -c "while true; do sleep 3600; done"

# 查看test2容器的ip地址:   72.17.0.4/16
[root@localhost ~]# docker exec test2 ip a
1: lo: <LOOPBACK,UP,LOWER_UP> mtu 65536 qdisc noqueue qlen 1000
    link/loopback 00:00:00:00:00:00 brd 00:00:00:00:00:00
    inet 127.0.0.1/8 scope host lo
       valid_lft forever preferred_lft forever
2: ip_vti0@NONE: <NOARP> mtu 1480 qdisc noop qlen 1000
    link/ipip 0.0.0.0 brd 0.0.0.0
155: eth0@if156: <BROADCAST,MULTICAST,UP,LOWER_UP,M-DOWN> mtu 1500 qdisc noqueue
    link/ether 02:42:ac:11:00:04 brd ff:ff:ff:ff:ff:ff
    inet 172.17.0.4/16 brd 172.17.255.255 scope global eth0
       valid_lft forever preferred_lft forever

# test2以ip的方式ping test1容器,没问题。
[root@localhost ~]# docker exec test2 ping 172.17.0.3
PING 172.17.0.3 (172.17.0.3): 56 data bytes
64 bytes from 172.17.0.3: seq=0 ttl=64 time=0.347 ms

# test2还可以以容器名作为ping的参数(因为在创建时候指定了link),link的方式类似于添加了一个dns的记录,因为test2可以不需要知道test1的具体ip地址,使用容器名称进行访问。
[root@localhost ~]# docker exec test2 ping test1
PING test1 (172.17.0.3): 56 data bytes
64 bytes from 172.17.0.3: seq=0 ttl=64 time=0.084 ms

#  test1可以使用ip地址ping test2
[root@localhost ~]# docker exec test1 ping 172.17.0.4
PING 172.17.0.4 (172.17.0.4): 56 data bytes
64 bytes from 172.17.0.4: seq=0 ttl=64 time=0.215 ms

# test1无法使用容器名称作为ping的参数
[root@localhost ~]# docker exec test1 ping test2
ping: bad address 'test2'

# 自定义bridge类型的网络
[root@localhost ~]# docker network create -d bridge my-bridge
0eb1d64f0e7d39a1605cecbde3aa37f9ed64fd00f1b8205880e046e50e34b234
[root@localhost ~]# docker network ls
NETWORK ID          NAME                DRIVER              SCOPE
8322f6f7f661        bridge              bridge              local
15bcd4ce7873        host                host                local
0eb1d64f0e7d        my-bridge           bridge              local
14172bae898c        none                null                local

# 查看当前本地所有bridge网络:br-0eb1d64f0e7d 就是刚才新创建的自定义bridge网络
[root@localhost ~]# brctl show
bridge name	bridge id		STP enabled	interfaces
br-0eb1d64f0e7d		8000.0242e925741a	no
docker0		8000.02422609dff1	no		veth57ea7d0
							veth7e65841
							veth8840821

# 创建容器test3,并指定自定义bridge
[root@localhost ~]# docker run -d --name test3 --network my-bridge busybox /bin/sh -c "while true; do sleep 3600; done"

# 查看所有bridge类型的网络 : 新的bridge已经有了interfaces
[root@localhost ~]# brctl show
bridge name	bridge id		STP enabled	interfaces
br-0eb1d64f0e7d		8000.0242e925741a	no		veth1cfd21f
docker0		8000.02422609dff1	no		veth57ea7d0
							veth7e65841
							veth8840821

# 验证新接口
[root@localhost ~]# ip a | grep veth1cfd21f
159: veth1cfd21f@if158: <BROADCAST,MULTICAST,UP,LOWER_UP> mtu 1500 qdisc noqueue master br-0eb1d64f0e7d state UP group default # 查看my-bridge中的Containers列表:发现test3容器已经加入my-bridge网络中。并且ip已经从 172.17.0.0网络变为 172.18.0.0。
[root@localhost ~]# docker network inspect 0eb1d64f0e7d | grep test
                "Name": "test3",
		IPv4Address": "172.18.0.2/16"


# 将已存在的容器加入:指定的bridge网络中。(一个容器可以同时加入多个不同的bridge网络中)
[root@localhost ~]# docker network connect my-bridge test2
[root@localhost ~]# docker network inspect 0eb1d64f0e7d | grep test
                "Name": "test3",		"IPv4Address": "172.18.0.2/16",
                "Name": "test2",		"IPv4Address": "172.18.0.3/16",
# test3 ping test2 : 已经现在test2也已经加入了my-bridge网络,所以可以使用容器名称作为Ping的参数,使用ip作为参数也可。
[root@localhost ~]# docker exec test3 ping test2
PING test2 (172.18.0.3): 56 data bytes
64 bytes from 172.18.0.3: seq=0 ttl=64 time=0.123 ms
[root@localhost ~]# docker exec test3 ping 172.18.0.3
PING 172.18.0.3 (172.18.0.3): 56 data bytes
64 bytes from 172.18.0.3: seq=0 ttl=64 time=0.088 ms

# test2 同时连接了docker0默认bridge ,有连接了my-bridge
[root@localhost ~]# docker exec test2 ip a
1: lo: <LOOPBACK,UP,LOWER_UP> mtu 65536 qdisc noqueue qlen 1000
    link/loopback 00:00:00:00:00:00 brd 00:00:00:00:00:00
    inet 127.0.0.1/8 scope host lo
       valid_lft forever preferred_lft forever
2: ip_vti0@NONE: <NOARP> mtu 1480 qdisc noop qlen 1000
    link/ipip 0.0.0.0 brd 0.0.0.0
155: eth0@if156: <BROADCAST,MULTICAST,UP,LOWER_UP,M-DOWN> mtu 1500 qdisc noqueue
    link/ether 02:42:ac:11:00:04 brd ff:ff:ff:ff:ff:ff
    inet 172.17.0.4/16 brd 172.17.255.255 scope global eth0
       valid_lft forever preferred_lft forever
160: eth1@if161: <BROADCAST,MULTICAST,UP,LOWER_UP,M-DOWN> mtu 1500 qdisc noqueue
    link/ether 02:42:ac:12:00:03 brd ff:ff:ff:ff:ff:ff
    inet 172.18.0.3/16 brd 172.18.255.255 scope global eth1
       valid_lft forever preferred_lft forever

# 如果test2创建的时候没有指定link test1 那么,虽然test2和test1都默认连接了docker0(默认bridge不支持使用容器名称访问),如果讲test1也连接到my-bridge上面,test2就则可以使用容器名称访问,此时与test1通信的网络地址是172.18.0.0网段。
[root@localhost ~]# docker network connect my-bridge test1
[root@localhost ~]# docker exec test2 ping test1
PING test1 (172.18.0.4): 56 data bytes
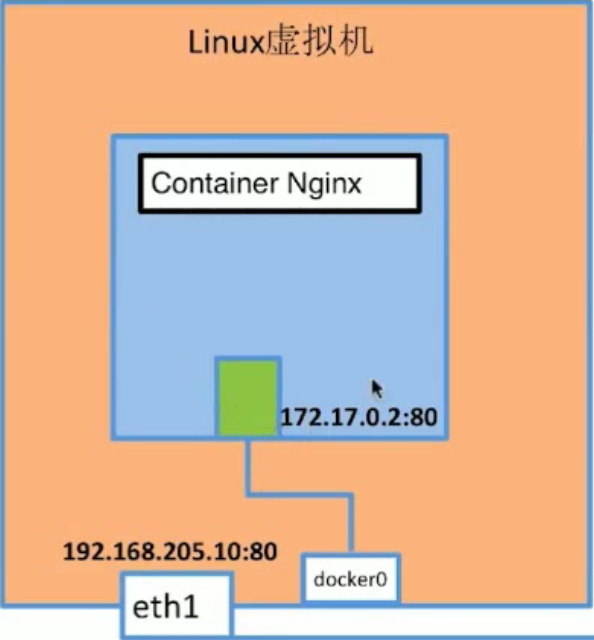
容器的端口映射
# 启动容器基于nginx镜像
[root@localhost ~]# docker run --name web -d nginx

# 查看bridge网络,查找Containers中的所有容器中名为web的容器,查看ip地址
[root@localhost ~]# docker network inspect bridge
        "4f6d5934695246edc343a348bc40f434a44f7db5de1eeefb77643574fffdd9d0": {
                "Name": "web",
                "EndpointID": "3d663a4e558db41a77e7978aa0d5d42a93445e917a9e5c94ca3786242e17484d",
                "MacAddress": "02:42:ac:11:00:05",
                "IPv4Address": "172.17.0.5/16",
                "IPv6Address": ""
            },

# ping ok
[root@localhost ~]# ping 172.17.0.5
PING 172.17.0.5 (172.17.0.5) 56(84) bytes of data.
64 bytes from 172.17.0.5: icmp_seq=1 ttl=64 time=0.160 ms

# curl 访问也 ok
[root@localhost ~]# curl http://172.17.0.5
<!DOCTYPE html>
<html>
<head>
<title>Welcome to nginx!</title>
<style>

# 让容器服务暴露在宿主机的物理网络中
[root@localhost ~]# docker run --name web -d -p 81:80 nginx
[root@localhost ~]# curl http://127.0.0.1:81
<!DOCTYPE html>
<html>
<head>
<title>Welcome to nginx!</title>
<style>
None Network
- 适用于仅本地访问的情形。
#
[root@localhost flask-hello-world]# docker run -d --name test4  --network none busybox /bin/sh -c "while true; do sleep 3600; done"
# 发现没有IP和MAC地址
[root@localhost flask-hello-world]# docker network inspect none
[
    {
        "Name": "none",
        "Id": "14172bae898c2b81ba4926303e839f71128b021b277127910bfb974b4d4fcba4",
        "Created": "2019-03-24T00:11:14.751327041+08:00",
        "Scope": "local",
        "Driver": "null",
        "EnableIPv6": false,
        "IPAM": {
            "Driver": "default",
            "Options": null,
            "Config": []
        },
        "Internal": false,
        "Attachable": false,
        "Ingress": false,
        "ConfigFrom": {
            "Network": ""
        },
        "ConfigOnly": false,
        "Containers": {
            "793d4d074babf6fea972261ed774caf08e8541cee7c376c41e2084f9ea4ff4c1": {
                "Name": "test4",
                "EndpointID": "c650d6269560784dbb03215f4a88e6416b722f91f16ee2bd55dc8aebafda1178",
                "MacAddress": "",
                "IPv4Address": "",
                "IPv6Address": ""
            }
        },
        "Options": {},
        "Labels": {}
    }
]

# 进入test4 发现只有回环接口
[root@localhost flask-hello-world]# docker exec test4 ip a
1: lo: <LOOPBACK,UP,LOWER_UP> mtu 65536 qdisc noqueue qlen 1000
    link/loopback 00:00:00:00:00:00 brd 00:00:00:00:00:00
    inet 127.0.0.1/8 scope host lo
       valid_lft forever preferred_lft forever
2: ip_vti0@NONE: <NOARP> mtu 1480 qdisc noop qlen 1000
    link/ipip 0.0.0.0 brd 0.0.0.0
Host Network
- 通过host创建的容器是共享本地的Network Namespace的。
# 创建test5容器并且制定网络类型host
[root@localhost flask-hello-world]# docker run -d --name test5  --network host busybox /bin/sh -c "while true; do sleep 3600; done"

# 发现test5的Network Namespace与本机的一样,因此可以判断通过host创建的容器是共享本地的Network Namespace的。
[root@localhost flask-hello-world]# docker exec test5  ip a

1: lo: <LOOPBACK,UP,LOWER_UP> mtu 65536 qdisc noqueue qlen 1000
    link/loopback 00:00:00:00:00:00 brd 00:00:00:00:00:00
    inet 127.0.0.1/8 scope host lo
       valid_lft forever preferred_lft forever
    inet6 ::1/128 scope host
       valid_lft forever preferred_lft forever
2: eno16777736: <BROADCAST,MULTICAST,UP,LOWER_UP> mtu 1500 qdisc pfifo_fast qlen 1000
    link/ether 00:0c:29:3d:e4:f6 brd ff:ff:ff:ff:ff:ff
    inet 192.168.31.210/24 brd 192.168.31.255 scope global eno16777736
       valid_lft forever preferred_lft forever
    inet6 fe80::20c:29ff:fe3d:e4f6/64 scope link
       valid_lft forever preferred_lft forever
3: docker0: <BROADCAST,MULTICAST,UP,LOWER_UP> mtu 1500 qdisc noqueue
    link/ether 02:42:26:09:df:f1 brd ff:ff:ff:ff:ff:ff
    inet 172.17.0.1/16 brd 172.17.255.255 scope global docker0
       valid_lft forever preferred_lft forever
    inet6 fe80::42:26ff:fe09:dff1/64 scope link
       valid_lft forever preferred_lft forever
4: ip_vti0@NONE: <NOARP> mtu 1480 qdisc noop qlen 1000
    link/ipip 0.0.0.0 brd 0.0.0.0
146: veth7e65841@if145: <BROADCAST,MULTICAST,UP,LOWER_UP,M-DOWN> mtu 1500 qdisc noqueue master docker0
    link/ether 8a:bd:28:39:22:b8 brd ff:ff:ff:ff:ff:ff
    inet6 fe80::88bd:28ff:fe39:22b8/64 scope link
       valid_lft forever preferred_lft forever
150: veth8840821@if149: <BROADCAST,MULTICAST,UP,LOWER_UP,M-DOWN> mtu 1500 qdisc noqueue master docker0
    link/ether 36:f2:e2:24:7b:29 brd ff:ff:ff:ff:ff:ff
    inet6 fe80::34f2:e2ff:fe24:7b29/64 scope link
       valid_lft forever preferred_lft forever
156: veth57ea7d0@if155: <BROADCAST,MULTICAST,UP,LOWER_UP,M-DOWN> mtu 1500 qdisc noqueue master docker0
    link/ether fe:91:6a:13:af:6b brd ff:ff:ff:ff:ff:ff
    inet6 fe80::fc91:6aff:fe13:af6b/64 scope link
       valid_lft forever preferred_lft forever
157: br-0eb1d64f0e7d: <BROADCAST,MULTICAST,UP,LOWER_UP> mtu 1500 qdisc noqueue
    link/ether 02:42:e9:25:74:1a brd ff:ff:ff:ff:ff:ff
    inet 172.18.0.1/16 brd 172.18.255.255 scope global br-0eb1d64f0e7d
       valid_lft forever preferred_lft forever
    inet6 fe80::42:e9ff:fe25:741a/64 scope link
       valid_lft forever preferred_lft forever
159: veth1cfd21f@if158: <BROADCAST,MULTICAST,UP,LOWER_UP,M-DOWN> mtu 1500 qdisc noqueue master br-0eb1d64f0e7d
    link/ether a6:85:53:8c:dd:66 brd ff:ff:ff:ff:ff:ff
    inet6 fe80::a485:53ff:fe8c:dd66/64 scope link
       valid_lft forever preferred_lft forever
161: vethe58898c@if160: <BROADCAST,MULTICAST,UP,LOWER_UP,M-DOWN> mtu 1500 qdisc noqueue master br-0eb1d64f0e7d
    link/ether 92:f8:fe:f4:0d:a7 brd ff:ff:ff:ff:ff:ff
    inet6 fe80::90f8:feff:fef4:da7/64 scope link
       valid_lft forever preferred_lft forever
165: veth8c891c7@if164: <BROADCAST,MULTICAST,UP,LOWER_UP,M-DOWN> mtu 1500 qdisc noqueue master docker0
    link/ether da:2f:65:64:34:ff brd ff:ff:ff:ff:ff:ff
    inet6 fe80::d82f:65ff:fe64:34ff/64 scope link
       valid_lft forever preferred_lft forever
169: veth4b84431@if168: <BROADCAST,MULTICAST,UP,LOWER_UP,M-DOWN> mtu 1500 qdisc noqueue master docker0
    link/ether 46:51:31:3f:14:42 brd ff:ff:ff:ff:ff:ff
    inet6 fe80::4451:31ff:fe3f:1442/64 scope link
       valid_lft forever preferred_lft forever
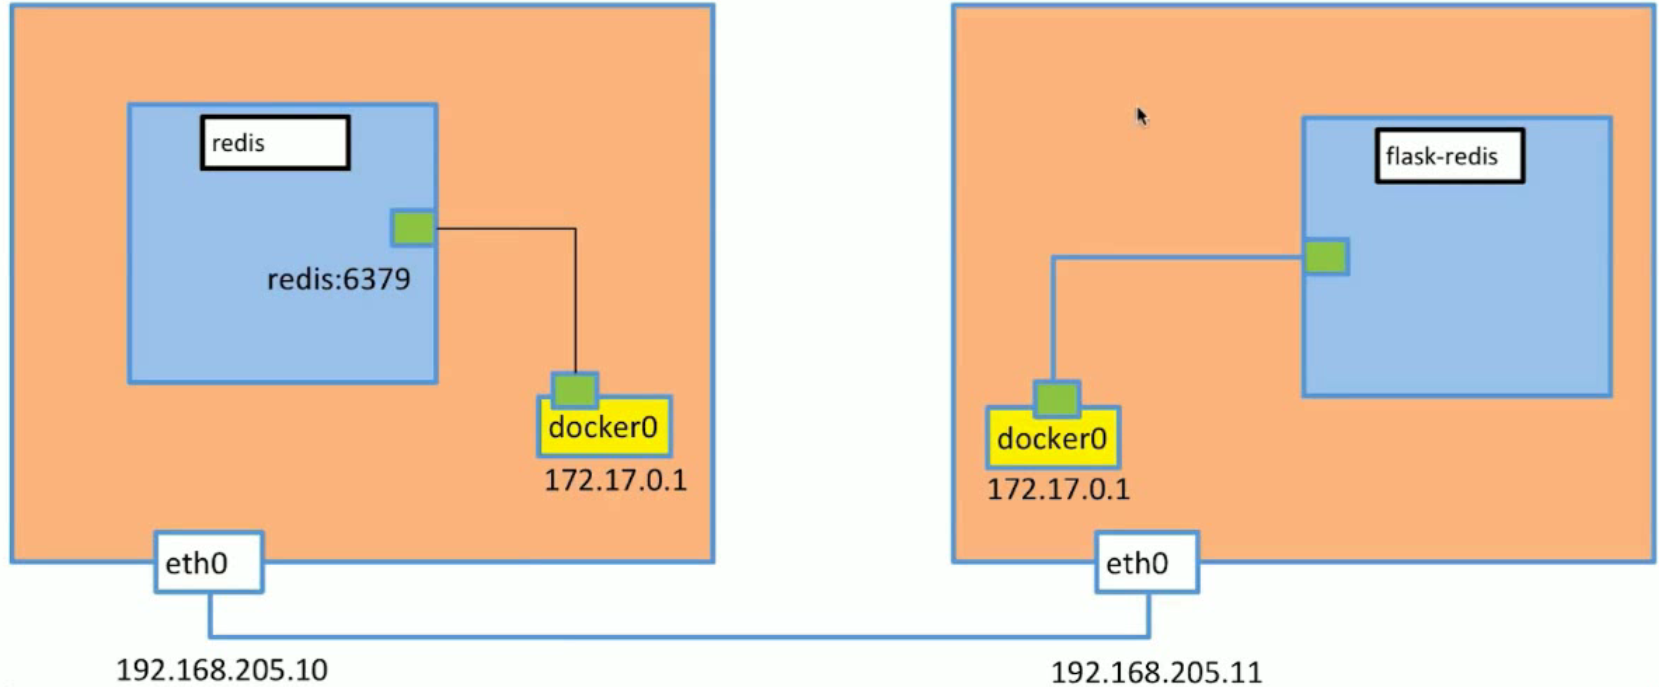
多容器复杂应用部署:参数传递
# Dockerfile
[root@localhost flask-redis]# cat Dockerfile
FROM python:2.7
LABEL maintaner="xxx"
COPY . /app
WORKDIR /app
RUN pip install flask redis -i http://pypi.douban.com/simple --trusted-host pypi.douban.com
EXPOSE 5000
CMD [ "python", "app.py" ]
# app.py
[root@localhost flask-redis]# cat app.py
from flask import Flask
from redis import Redis
import os
import socket
app = Flask(__name__)
redis = Redis(host=os.environ.get('REDIS_HOST', '127.0.0.1'), port=6379)
@app.route('/')
def hello():
redis.incr('hits')
return 'Hello Container World! I have been seen %s times and my hostname is %s.\n' % (redis.get('hits'),socket.gethostname())
if __name__ == "__main__":
# 构建镜像flask-redis
[root@localhost flask-redis]# docker build -t rtsfan1024/flask-redis .
# 启动redis容器
[root@localhost flask-redis]# docker run -d --name redis_one redis
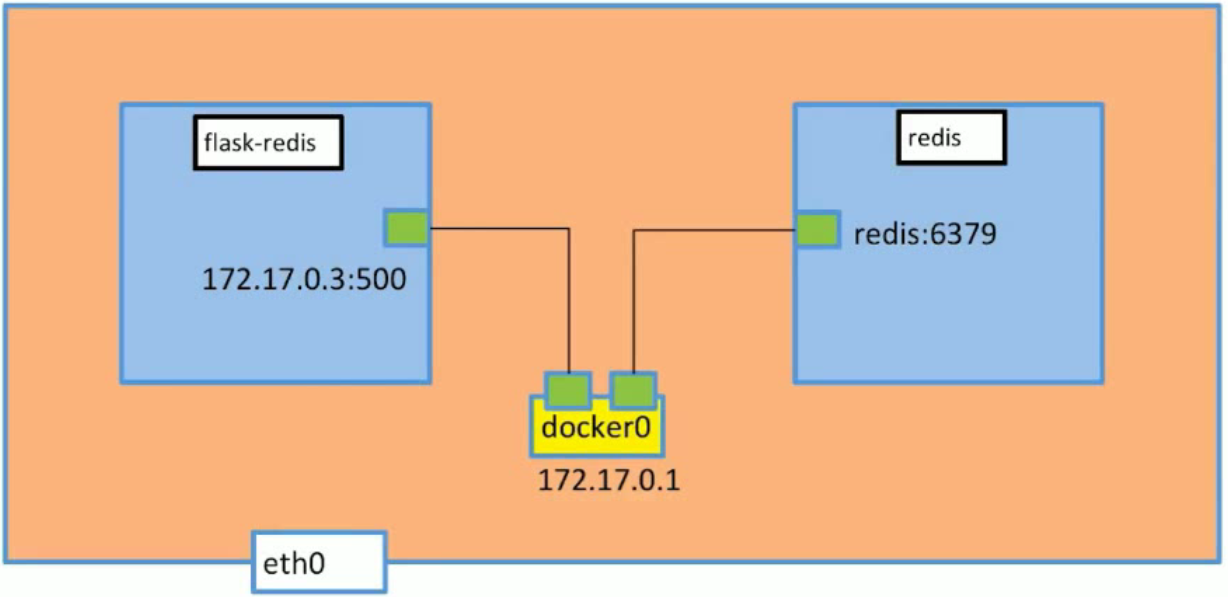
# 启动flask-redis容器 并且将reids_one容器作为参数传入给创建容器的REDIS_HOST的值。
[root@localhost flask-redis]# docker run -d -p 5000:5000 --link redis_one --name flask-redis -e REDIS_HOST=redis_one rtsfan1024/flask-redis
# 在本机测试发现flask-redis容器可以成功访问reids容器:显示容器之间的互通。
[root@localhost flask-redis]# curl 192.168.31.220:5000
Hello Container World! I have been seen 1 times and my hostname is e1103ff7eec1.
# 进入容器flask-redis 查看环境变量REDIS_HOST的值
[root@localhost flask-redis]# docker exec -it flask-redis /bin/bash
root@e1103ff7eec1:/app# env | grep REDIS_HOST
REDIS_HOST=redis_one
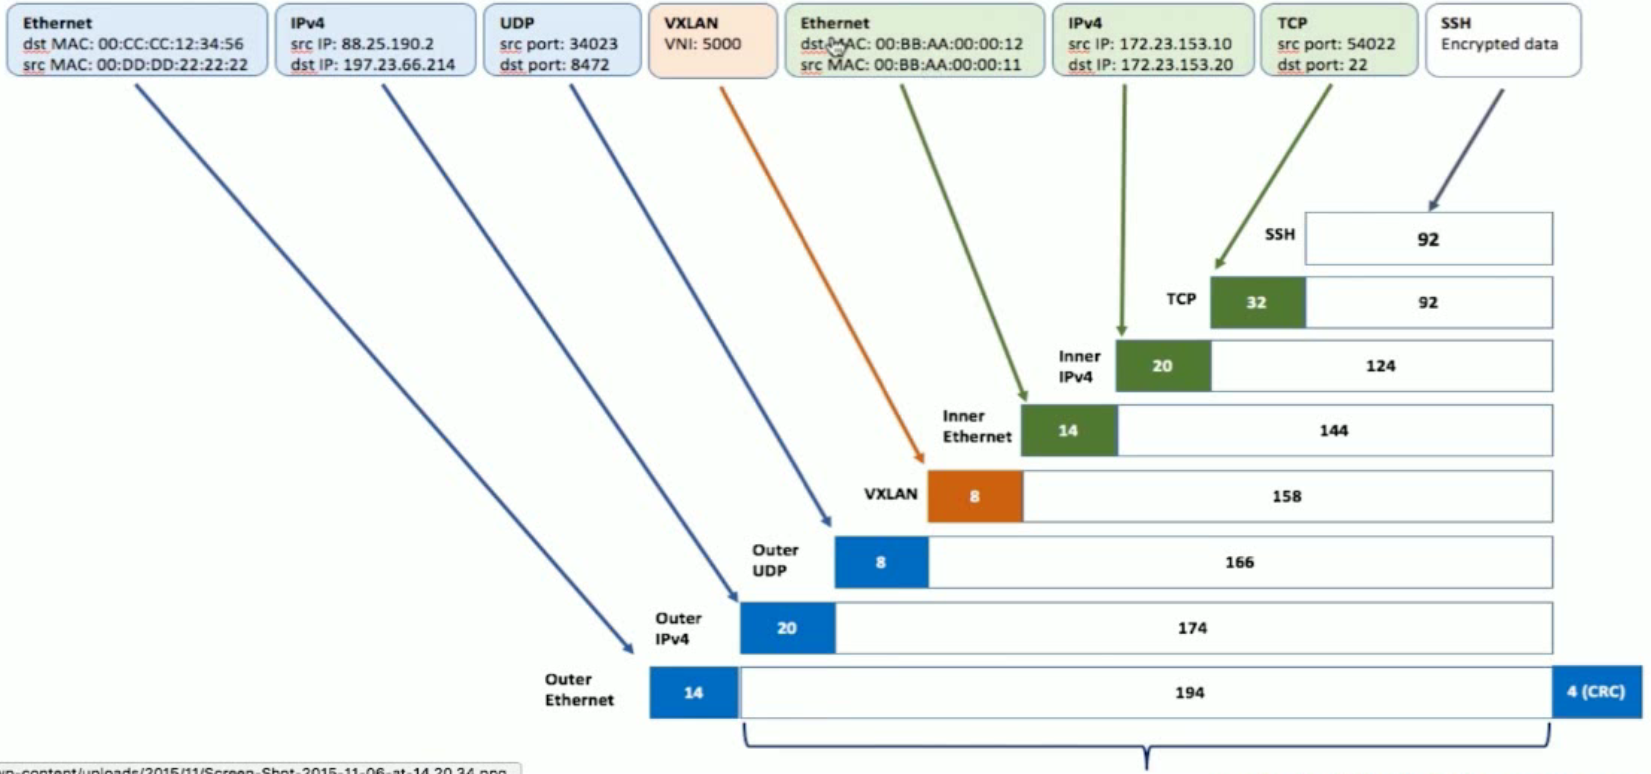
多机器通信:overlay